

Find, Fix and Strike is a set of fast-play Second World War tactical naval wargame rules written by David Manley and published by Long Face Games in 2019. The rules are derived from Si Vis Pacem, a set of fast-play rules for First World War naval actions published in 2018. In effect, Find, Fix and Strike is a Second World War version of Si Vis Pacem, with the important addition of carrier operations. Indeed, the name "Find, Fix and Strike" is the motto of the Royal Navy’s Fleet Air Arm.
Find, Fix and Strike also includes a set of operational-level campaign rules that provide a framework for linked battles. So the rules contain two games: a tactical wargame with six-minute intervals and an operational wargame with four-hour intervals.
The rules include data for more than 200 ship classes and individual ships from the navies of France, Germany, Great Britain and Commonwealth, Italy, Japan, the Netherlands, the Soviet Union, Sweden and the United States. There is also data for more than 60 aircraft types.
The rules are intended for surface actions and carrier battles involving large warships and not designed for submarine attacks or coastal forces actions, though motor torpedo boats (MTBs) are included in the rules.
There are no scenarios included in the rules, but you can download four free historical and semi-historical operational campaigns based on a hypothetical German invasion of Iceland in December 1940, the near interception of Force H by the Italian fleet in February 1941, a potential break out by the battleship Tirpitz in November 1941, and the Battle of North Cape in December 1943.
The tactical game doesn’t need any special equipment: all you need are ship and aircraft miniatures, a large table, a measuring tape, six-sided dice and the scenario that you want to play -- though paper, smoke markers and splash markers will be useful too. The operational-level game will need a map of your area of operations, whether that’s the North Sea, the central Mediterranean or the waters off Guadalcanal, which is perhaps best sourced from a board game if you are not using one of the four campaigns written for the game.
What works well
Scope
Find, Fix and Strike operates at the level of an admiral or vice-admiral commanding a fleet or a task force, not a captain commanding a ship. The game represents ships being damaged or sunk, but not always what specific damage they have suffered.

The British carrier Eagle with her escorts, the cruiser Gloucester and two J-class destroyers in 1/3000 scale.
Si Vis Pacem was written to enable Jutland to be wargamed in a day. With more or less the same core mechanics, Find, Fix and Strike is perhaps best suited for fleet actions involving half a dozen ships or more on each side -- such as Calabria (or Punto Stilo) in 1940 or Matapan in 1941 -- where detailed gunnery or extensive record keeping could really slow a game down, rather than small battles with a few smaller ships. Indeed, the inclusion of carrier operations within the same turn sequence as gunnery, the name of the game and the picture of Matapan on the cover all suggest that these rules were designed with the Mediterranean battles of Calabria, Cape Spartivento or Matapan in mind, where aircraft from a single British carrier attacked Italian ships during a fleet action. My big question is whether these rules enable Matapan, the Coral Sea or Midway to be played in a day (or two, as the battles themselves lasted several days).
However, the scope of these rules, particularly the campaign game, is much wider than surface actions and carrier operations, encompassing aircraft, submarines, motor torpedo boats, mines, shore bombardments, kamikazes and even guided bombs. You could use these rules to refight the Channel Dash or an entire Malta convoy operation, like Operations Tiger or Pedestal, with the convoy coming under attack from a succession of aircraft, submarines, MTBs and the Italian fleet. There are even rules for rain squalls. Maybe you can’t game a midget submarine attack on ship in harbour, but there aren’t many aspects of Second World War naval warfare that are not encompassed somewhere in these rules.
Campaigns
Find, Fix and Strike offers a simple system for operational-level campaigns, divided into turns with four-hour intervals. This is what really enables you to re-stage classic Second World War battles like Matapan, the Bismarck Chase, the Coral Sea or Midway that involved multiple separate actions fought over the course of a day or more.
You can download four free historical and semi-historical operational campaigns from Wargames Vault. These are based on a hypothetical German invasion of Iceland in December 1940, the near interception of Force H by the Italian fleet in February 1941, a potential break out by the battleship Tirpitz in November 1941, and the Battle of North Cape in December 1943. Not all of the campaigns conform to the same four-hour campaign turn.
The turn sequence
The turn sequence in the tactical game is straightforward: initiative; ship movement; air operations; gunnery; torpedoes; and end (mostly damage control). Each turn represents six minutes.
Initiative
The initiative determines which ships move and shoot first and is decided primarily by a roll of a die. Fleets or squadrons that are led by a brilliant admiral or have at least one ship equipped with radar are more likely to win the initiative. The winner of initiative decides whether to move first or second, and whether to fire first or second. That offers an advantage, but not a substantial one as gunnery alternates by ship, rather than all of one fleet firing first.
Visibility and sighting
Visibility is determined by a roll of the dice, and whether the game is set in daytime or at night. Poor weather, including rain squalls, mist and fog, can reduce visibility.
All ships spot at the same distance, which keeps things simple in the spirit of fast play.
Radar
The rules encompass both surface-search and fire-control radar. Surface-search radar can spot targets at longer ranges in poor visibility. Fire-control radar, similarly, offers a gunnery bonus in poor visibility.
Movement
Movement is straightforward. The initiative rule means that there’s no need to plot movement or write orders down. Movement is by squadrons, alternating by side. Ships can only move directly forward, or turn. Faster ships in the game can move 6" or 7" each turn, which means a ship will take about 12 turns to get from one end of a 6ft table to the other.
As in many naval wargames, speeds are rounded to the nearest inch. This means that historically slightly faster ships cannot chase down slightly slower ones.
Unlike Si Vis Pacem, destroyers operate as individual ships rather than being grouped into flotillas. Motor torpedo boats (MTBs) are grouped into flotillas.
Large ships are restricted to turning no more than 90 degrees in a turn. This restriction makes no sense in a six-minute turn as even the huge battleships of the Yamato and Iowa classes could turn 180 degrees in less than a minute. I don’t really see why this restriction is needed, unless it is to prevent players from cheating by turning their ships at the end of a turn to bring all their guns to bear when their ship has actually been steaming towards or away from the enemy -- though the rule that ships must turn at the beginning of their movement already covers that.
Gunnery mechanics
Hitting a fast-moving target with a large gun from a moving platform at long distance is difficult, so the rules to model gunnery are the core of any age of steam wargame. The gunnery mechanic in Find, Fix and Strike is basically the same as in Si Vis Pacem. Gunnery ranges in Find, Fix and Strike are simplified into five range bands: short, medium, long, very long and extreme.
Each ship has an ‘attack factor’, which is an abstract of the weight of its broadside, and a ‘defence factor’, which is not clearly explained but seems to be an abstract of its construction and armour and how hard it is to hit. Gunnery is resolved by comparing the attacking ship’s attack factor, any modifiers and a single attacking die roll with the target ship’s defence factor and a defending die roll. If the attacking ship’s total is greater than the target ship’s total, then the target ship is lightly damaged. If the attacking ship’s total is double the target ship’s total, then the target ship is heavily damaged. Armour penetration depends on the range. If guns can’t penetrate the opposing ship’s armour, they can only inflict light damage. Special damage (i.e. critical hits) results if the target ship rolls a one.
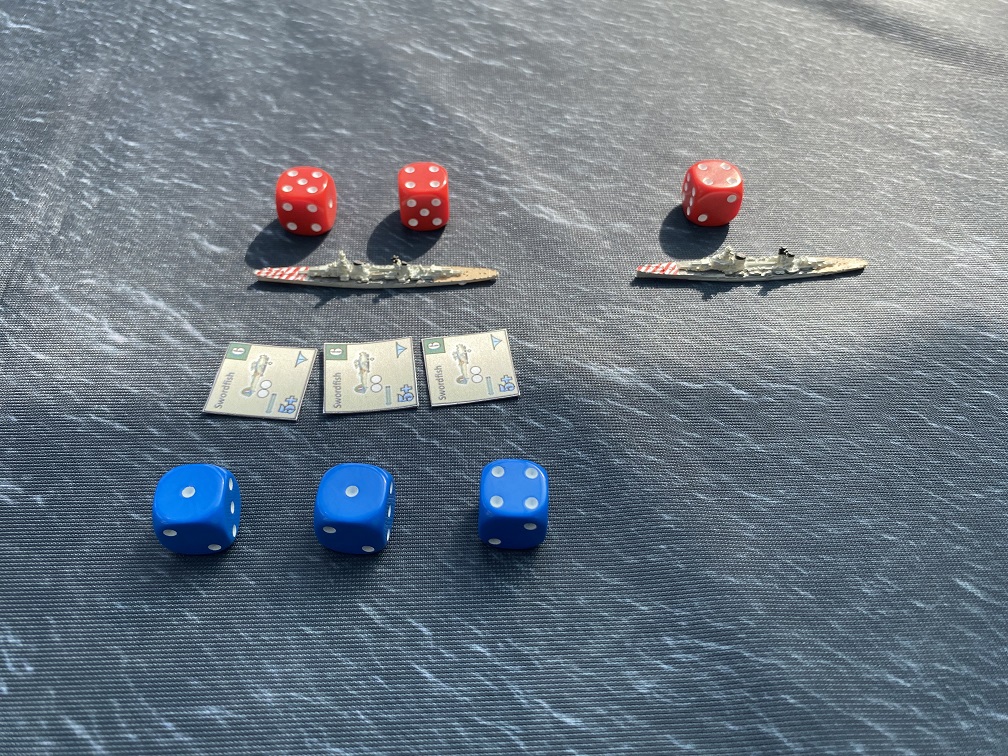
To illustrate the mechanic I set up the first capital-ship encounter of the Second World War, when the British battlecruiser Renown ran into the German fast battleships Gneisenau and Scharnhorst off the Vestfjord on the morning of 9th April 1940. Renown, catching the German ships by surprise, opens fires at 13,000 yards in the early morning light. She has an attack factor of 4 (15" guns), but the stormy seas reduce that by -1, and as she is turning she can only fire her forward guns for another -1; she rolls a 4, for a total of 6. Gneisenau has a defence factor of 5 and rolls a 3, for a total of 8. Renown’s total is lower, so she does no damage to Gneisenau.
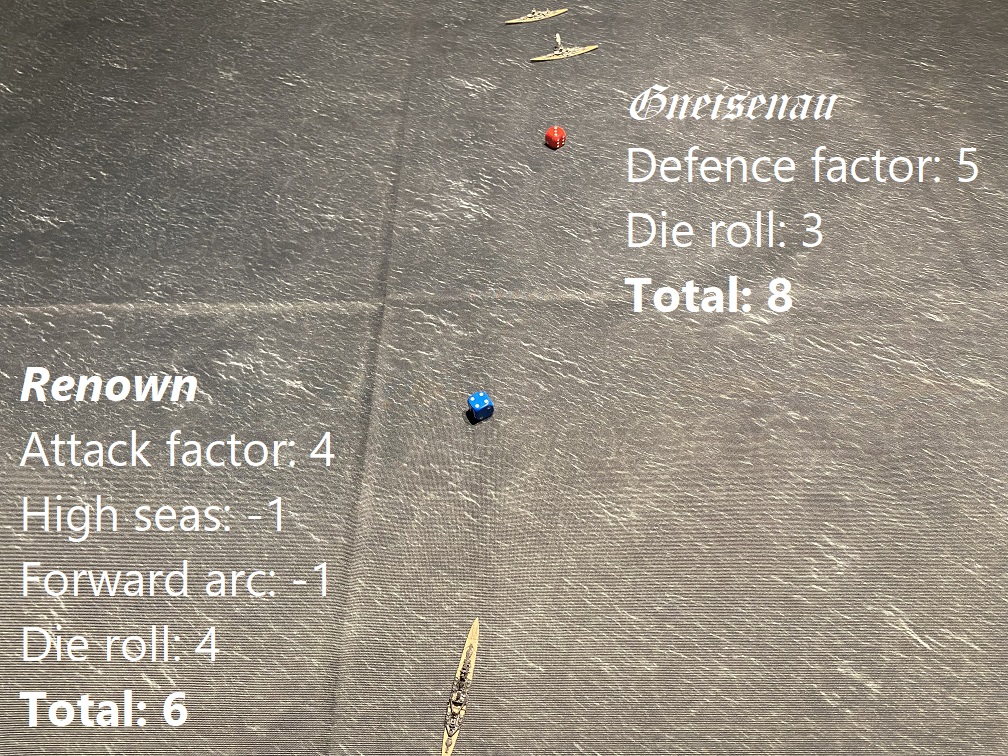
The British battlecruiser Renown (bottom) engages the German Gneisenau (top).
On the next turn the Germans win the initiative and Gneisenau is first to fire back. She has an attack factor of 3 (11" guns), but the stormy seas reduce that by -1; she rolls a 5, for a total of 7. The Renown has a defence factor of only 3 and rolls 1, for a total of 4. That’s a terrible score and results in special damage to the Renown. Had Gneisenau rolled 6 for a total of 8 she would have doubled Renown’s score, to cause heavy damage and end the battle as a contest on the first turn. But it is bad enough as it is: light damage and a roll on the ‘special damage’ table that results in Renown losing one of her main turrets because even Gneisenau’s 11" shells can penetrate Renown’s thin armour at long range. That light damage is enough to reduce the effectiveness of the Renown’s gunnery.
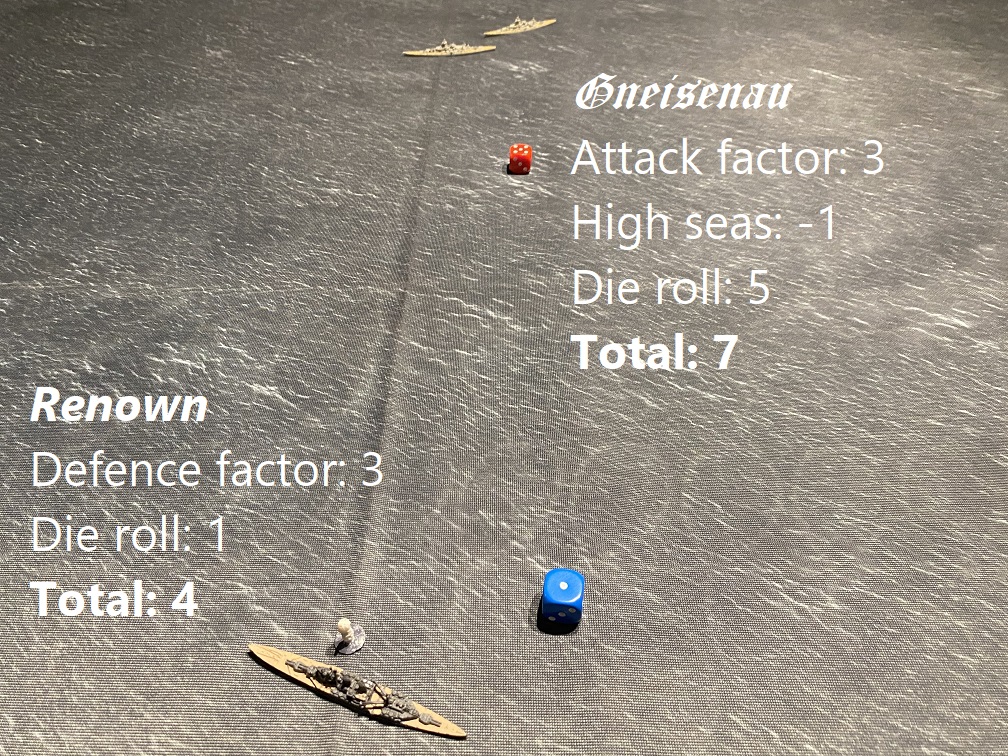
The Gneisenau (top, left) fires back at the Renown (bottom).
Unlike movement, which is by squadron or division, firing is resolved ship by ship, alternating by side, until all ships have fired. So Renown can return fire before Scharnhorst opens fire.
So gunnery in Find, Fix and Strike is pretty quick -- and the Royal Navy was lucky that Gneisenau was inexplicably firing high-explosive, not armour-piercing, shells on 9th April 1940. I find myself getting confused between ships’ defence factor and the similar sounding protection factor (which is their armour).
As an aside, I don’t really know what the defensive die roll represents. I like to associate actions in the game with something that happened historically. The attacking die roll is the gunnery officer aiming and the turret crews firing the ship’s guns. But what is the defensive die roll? The captain of the ship trying to steer out of the path of the shells hurtling towards him? The crew praying that the shells miss? Shutting the watertight hatches?
Damage resolution
As you would expect for a fast-play set of rules, damage resolution is kept simple. Rather than tracking damage points, damage is recorded through a series of levels: ships are lightly damaged, heavily damaged, crippled, silenced or sunk. That is the same as Si Vis Pacem, except that the crippled and silenced levels are new.
Light damage affects a ship’s gunnery; heavy damage affects its gunnery, speed and ‘defence factor’, presumably meaning that the crew are already struggling with damage control. Players can roll to conduct repairs, effectively damage control, during the end phase.
The rules suggest tracking damage using either counters or markers, such as grey smoke for light damage and black smoke for heavy damage. You will need to either use markers or keep notes on paper or an electronic device.
In the end, I am not a fan of the ‘special-damage’ rule. Although I like the additional narrative that comes from having a ship suffering a fire or having its rudder jammed, the rule conflicts with the simple, fast-play spirit of the game. Having reduced gunnery to fast and simple mechanic, why then complicate it by adding an extra step and obliging players to track specific damage in a game with no system for doing so? Conditional rules such as ‘AF-1 if shooter’s AF greater than or equal to target’s DF’ are neither easy to understand nor easy to keep track of.
Carrier operations
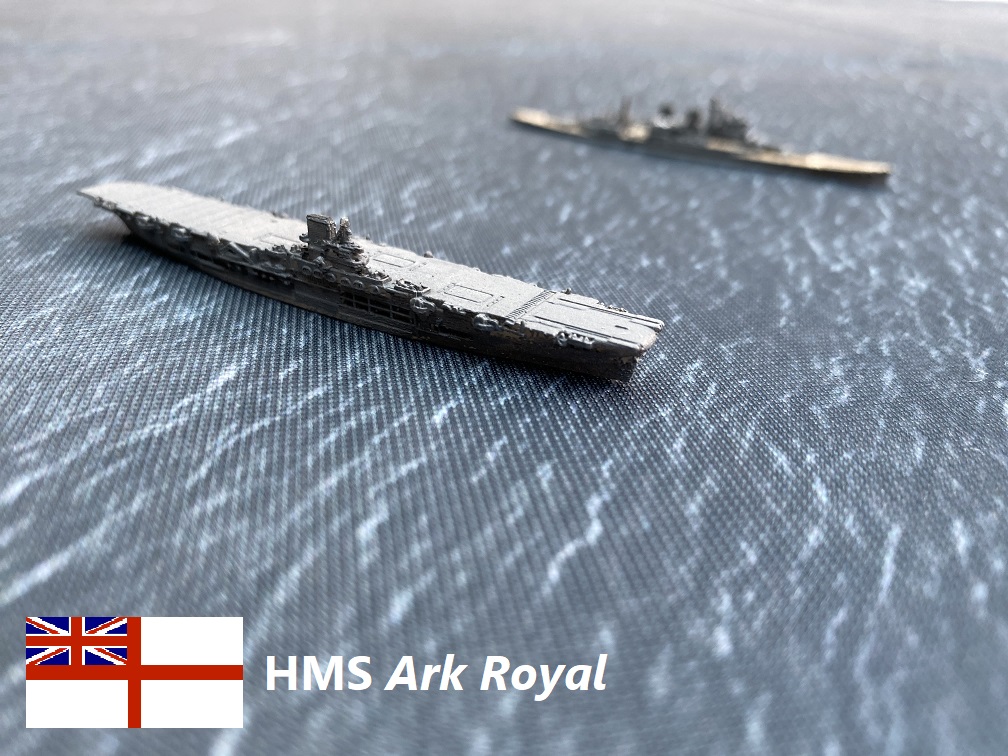
The British carrier Ark Royal in 1/3000 scale from Tiny Thingamajigs.
Carrier operations are, in a way, the raison d’etre of a set of rules named after the Fleet Air Arm’s motto. The carrier operations in the campaign rules mean you can use these rules to recreate carrier battles like the Coral Sea, Midway, Eastern Solomons and Santa Cruz. Intriguingly, the incorporation of carrier operations into the tactical rules mean that you can weave surface actions and air strikes together, recreating actions like Calabria, Spartivento, Matapan and Samar where carrier aircraft attacked warships during a surface action.
The inclusion of carrier operations in the tactical rules implies putting carriers on the same table as enemy surface warships. I can only think of three times in the Second World War when carriers actually came in sight of enemy surface warships: 8th June 1940 when Glorious fatally ran into Scharnhorst and Gneisenau; 28th March 1941 when Formidable was still in the battle line in the night action at Matapan; and 25th October 1944 when Admiral Kurita’s Centre Force met the escort carriers of Taffy 3 off Samar.
Carrier aircraft are divided into flights of three or four planes, as they were historically; reconnaissance and spotter aircraft carried by battleships or cruisers operate individually. Carriers can either launch or recover aircraft in a turn, not both. Carriers can launch or recover three flights per turn in the tactical game. Oddly, there is no requirement for a carrier to turn into the wind.
The tactical rules offer no system for tracking the status of a carrier’s aircraft, whether rearming or refuelling in the hangar or damaged in combat. That’s probably fine for a game with a single British carrier with about nine flights of aircraft; I’m not sure it would work for the much larger air groups at the Coral Sea or Midway, let alone Leyte Gulf. The biggest American and Japanese carriers in the game such as the Lexington, Yorktown, Essex and Shokaku classes, can operate as many as 24 flights.
The operational rules recommend tracking aircraft on carriers and at airfields with a series of boxes, so you need to draw these up before a game. That is a missed opportunity. It would have been easy to have included either a generic carrier operations template or chart, or specific carrier operations cards such as those found in Avalanche Press’s Bismarck, Eastern Fleet and Midway board games or Sam Mustafa’s Nimitz.
Air strikes
To illustrate how air strikes work, let’s recreate an attack by three flights of Swordfish torpedo bombers during the Battle of Calabria in July 1940.
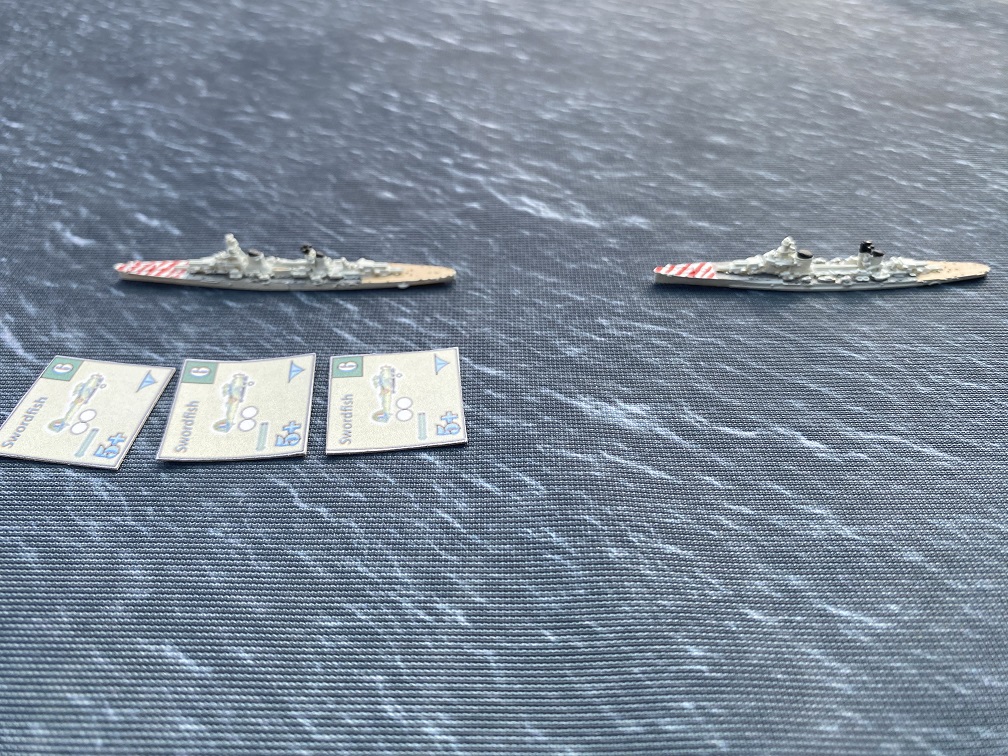
Three flights of Swordfish attack the Italian cruisers Trento and Bolzano, concentrating on the leading cruiser, Trento. (I don’t have suitable aircraft miniatures, so am using counters instead.)
The ships engage the torpedo bombers with their anti-aircraft guns, with Bolzano supporting Trento as she is within 4,000 yards. Larger ships can split their AA fire, so Trento fires at the first two flights while Bolzano concentrates on the third flight.
Every ship has an anti-aircraft factor, which is typically 3 for a modern battleship, 2 for a cruiser or carrier, and 1 or nothing for a destroyer. Anti-aircraft fire is resolved in a similar way to gunnery, with both the defending ships and the attacking aircraft rolling a single die to which is added the ship’s AA factor and the aircraft’s air-to-air (A2A) factor respectively.
Trento’s anti-aircraft fire proves highly effective: the first flight of Swordfish is destroyed, while the second flight is damaged and driven off. Bolzano only damages the third Swordfish flight, but even that is enough to mean the torpedo bombers will abort on a die roll of 4+.
Now, obviously, those weren’t great dice rolls for the British. But given that no carrier strike aircraft in the game has an A2A factor better than 1 and most cruisers and above have an AA factor of 2, it’s more likely than not that anti-aircraft fire from one or two ships will damage, drive off or outright destroy at least one if not two attacking flights. It’s hard to think of an air attack in the Second World War, before radar guidance, where the anti-aircraft fire was that effective, so that outcome doesn’t align well with history. The Bismarck, for example, failed to shoot down a single Swordfish from the eight flights sent against her (in two separate attacks), though the Tirpitz shot down two of 12 Albacores when she was attacked in 1942. Italian anti-aircraft fire only shot down one aircraft in some seven torpedo attacks by British carrier aircraft in 1940 and 1941. The Japanese cruisers Mogami and Mikuma shot down one Vindicator of 12 Marine aircraft that attacked them on 5th June 1942, and two of 56 Navy Dauntlesses (18 flights) that attacked them the following day. It was defending fighters, not anti-aircraft fire, that proved lethal to attacking strike aircraft. Of course it’s just a game, not a simulation, but with anti-aircraft guns this good, ships in the game have little to fear from aircraft in general, limiting the value of both carrier aircraft and aircraft carriers.
The third flight of Swordfish press home their attack.
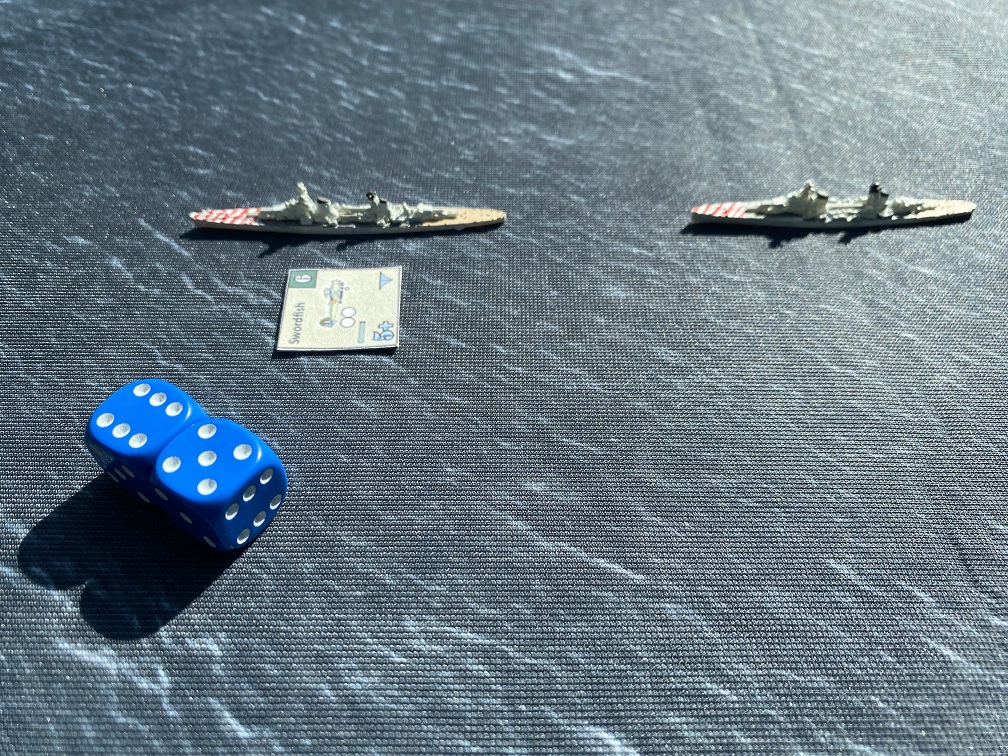
To finish our Swordfish attack on the Trento, the third flight of Swordfish successfully rolls a 3 to press home the attack. The flight needs 11+ on two dice (2D6) for their torpedoes to hit, but must subtract 1 from the roll because of the damage from the anti-aircraft fire. The flight rolls 11. Their torpedoes narrowly miss the Trento. (It’s not clear whether aircraft get the modifier for dropping torpedoes within 2,000 yards, but I assume not.)
So having run the gauntlet of the anti-aircraft fire, it is then extremely difficult to achieve a torpedo hit. Unlike the anti-aircraft fire, I think David Manley has got the chances of a torpedo hit right: 11+ is three chances in 36, or about 8%. By my reckoning, the Fleet Air Arm dropped 120 torpedoes at enemy ships at sea in 15 attacks between 1940 and 1942 and scored about five hits, or 4%.
I like the way anti-aircraft fire can distract or drive off attacking aircraft even if it doesn’t knock them out of the sky. Note that the existence of ‘damaged’ flights means that you have to track the status of individual flights: being either shot down / unflyable or undamaged would probably be simpler and play faster in games with multiple carriers.
What could be better
Scale
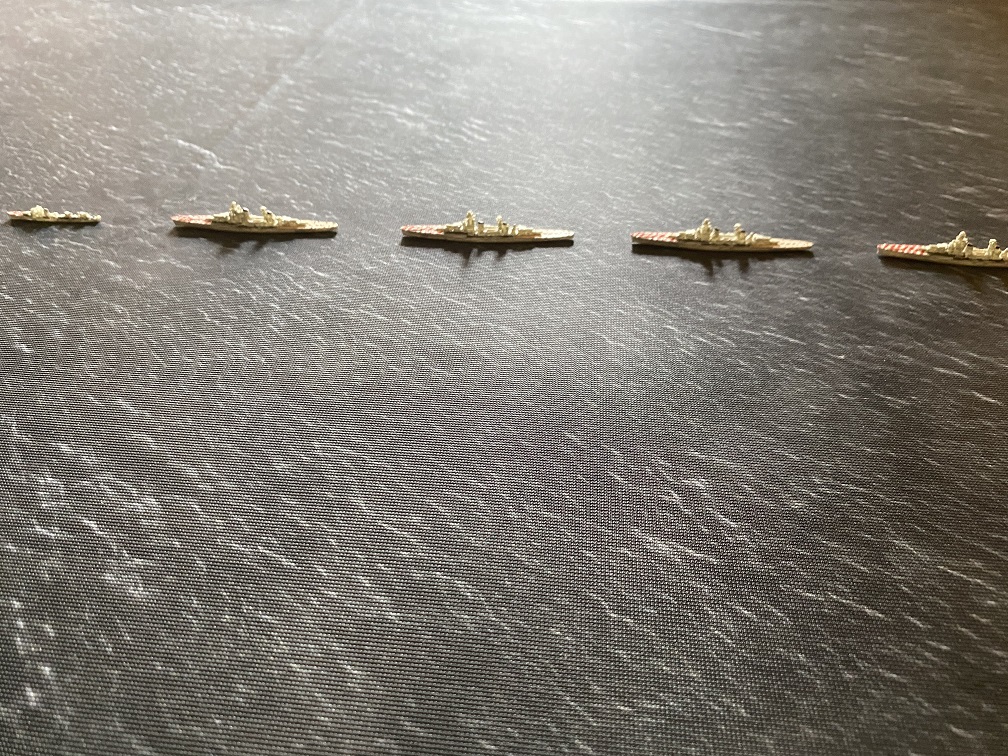
The Italian cruisers Pola, Zara, Gorizia and Fiume in 1/3000 scale take up 12" on the table.
The large guns mounted on capital ships almost always force a compromise between miniature scale and sea scale in age of steam naval wargames. Find, Fix and Strike uses a scale of 1” to 1,000 yards (which is 1/36,000) and is designed for use with 1/2400, 1/3000 or 1/6000 scale miniatures. That means that 1/3000 miniatures, for example, are 12 times larger relative to distances than the ships they are representing on the table top.
That is tight and creates some distortions that you need to beware of. A typical Second World War cruiser, such as the British Southampton class or the American New Orleans class, was about 180 metres, or nearly 600 foot, long. So a typical cruiser in 1/3000 scale is about 60 mm or well over two inches long, while a typical cruiser in 1/2400 scale is even longer, before adding the additional length of a base. That means that model ships are well over 2,000 yards long in sea scale and a cruiser squadron on the table top could be 12,000 yards long with each ship 3,000 yards apart. Miniature ships in the same squadron that look close together on the table top can be 1,000s of yards closer to or further away from the enemy. That sets up a tactical problem in the game because the rear ships in a squadron or force may well be out of range and unable to support the leading ships in the same squadron, increasing the tendency for gunfire to concentrate on the leading ship in a squadron.
Beware that if you use larger miniature scales, such as 1/1800 or 1/1200, you’ll face an even bigger compromise between miniature scale and sea scale. If you have the table space to double or even triple movement speeds and weapon ranges, it’s worth doing so. I recommend increasing the distances in the tactical game to 2" or 10cm or more to 1,000 yards if you have the space. Unfortunately the rules are written in inches, rather than thousands of yards, which means you have to remember a small calculation if you change your sea scale.
Air combat
Air combat in Find, Fix and Strike uses the same opposing die roll system as gunnery, which is more intuitive for air-to-air fighting than it is for gunnery.
Let’s take an example of three flights of American F4F Wildcats engaging a flight of Japanese E13A float planes, which ought to be a pretty uneven combat.
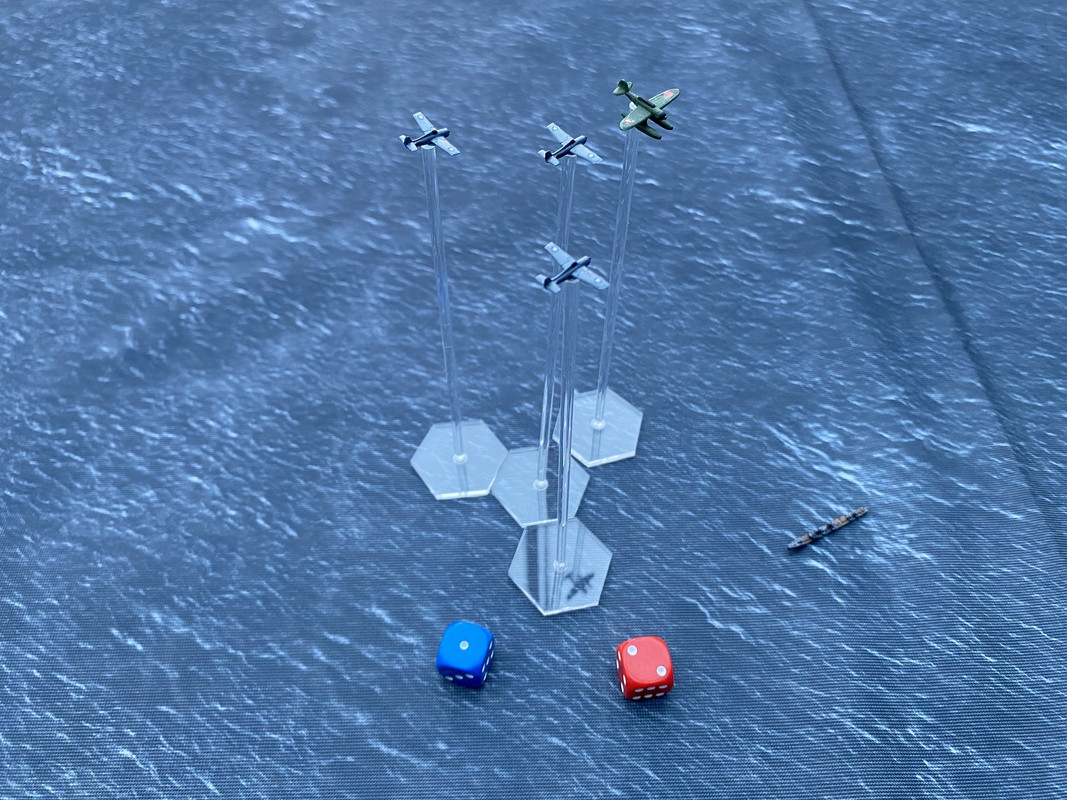
The Wildcat has an air-to-air factor of two (2), compared with nought (0) for the E13A. There are three flights of Wildcats, but only two can attack, with the second only adding half its air-to-air (A2A) factor to the calculation. Each flight of aircraft now rolls a die and adds its air-to-air factor. The Wildcat flight rolls a one, adding two for its air-to-air factor and another one for the support from the second flight, for a total of four. The E13A flight rolls a two, adding nothing. Doubling the enemy’s score is only enough to damage and drive off the Japanese float planes. To destroy them, the Wildcats would need to triple the Japanese score.
Air combat uses the same results table as anti-aircraft fire. This seems efficient, but the table is not nearly lethal enough for air combat. Because aircraft need to triple the opposing aircraft’s score, a flight of Wildcats has only a 25% (9 in 36) chance of destroying a flight of float planes like the E13A in the first round of combat. A flight of Wildcats cannot shoot down a flight of A6M Zeros in a single attack because it is impossible to triple the A6M’s air-to-air (A2A) factor of three, plus a minimum roll of one, whatever the Wildcats’ die roll. The best the Wildcats can achieve against A6M Zeros is a damaged result, needing another damaged result in a second round of combat to destroy a flight of A6Ms. Even the F4U Corsair and the F6F Hellcat have only a 1 in 36, or 3%, chance of destroying a flight of A6M Zeros in the first round of combat, and vice versa.
Damage is a far more likely outcome than destruction with almost any combination of aircraft. That means you have to track damage for individual flights of aircraft, which is unwieldy in battles with more than a few flights of aircraft and too much tracking for a fast-play set of rules.
There are two easy fixes to make air-to-air combat a bit more lethal, and hence combat air patrols a bit more effective: either treat the ‘damaged, driven off’ result as a ‘destroyed’ result or alternatively instead of having to double or triple the opponent’s score, base the outcome on scoring two or three points more than your opponent.
It’s easy to quibble with individual unit ratings in any historical wargame, but I can’t help thinking the A6M Zero is probably overrated in the game as the equal of the Hellcat and the Corsair: yes, the Zero was fast, well armed and highly manoeuvrable, but its lack of pilot armour and self-sealing fuel tanks made it vulnerable once Allied pilots learned not to dogfight with it.
Data cards
Data cards are common in most modern wargame rules because they save time looking up speeds, armament or gunnery ranges and tracking damage. Find, Fix and Strike doesn’t use data cards, recommending that you track damage levels with markers. That is clever in principle.
In practice, it’s hard to remember the attack, defence and protection factors for more than a few ships, so you end up either referring back to the rules to check gunnery and torpedo statistics that you don’t remember, writing them down somewhere, or printing them out on a scenario sheet.
Tracking damage levels with markers alone doesn’t really work because the special-damage rule means that you need to track ships that have had their radar, their steering, a main turret or some secondary guns knocked out. You either need a lot of different markers, or you need to note it down somewhere.
Some basic ship and aircraft data cards would make Find, Fix and Strike an easier, and faster, game to play.
Scenarios
There is some good guidance in the rules on how to set up a scenario, including the weather, but no scenarios are actually included. The free campaigns are great, but it is a pity that the game does not include few simple historical scenarios, like the River Plate, the action off Vestfjord, the Denmark Strait, Cape Esperance or, better, some battles involving carriers like Matapan or the Coral Sea.
While some wargamers already have their own scenarios and enjoy creating them, others don’t. It’s not hard to create scenarios, or convert them from other rules, but including a few historical scenarios would make the game a little easier to pick up and play. Hopefully some will be added to future editions. The new North Cape campaign, with an actual historical battle, is a great step in a good direction.
Abbreviations
Abbreviations save space when everyone understands them, and slow things down when they don’t. There are a lot of them in Find, Fix and Strike. Some abbreviations, such as AA for anti-aircraft, BB for battleship, CV for aircraft carrier and DD for destroyer, are familiar to most people with an interest in naval history. But there are plenty of less-familiar abbreviations like A2A (air-to-air), AA (transport), AF (attack factor), DF (defence factor), HT (heavy torpedoes), LF (light torpedoes, facing forwards), LRT (long-range torpedoes), PF (both penetration factor and protection factor), RAD/RNG (radius, range), SS (surface search) and X (extreme) that make the rules hard to follow in places. For example, ‘DF reduced by 1 if shooter’s AF greater than or equal to target’s DF’.
In some cases these abbreviations don’t even save space as there’s room to spell out words like ‘level’, ‘dive’, ‘light’ or ‘heavy’. You end up having to look up abbreviations a bit too often.
Support
There isn’t that much support for Find, Fix and Strike players. While David Manley does sometimes answer questions on Wargames Vault and some forums, there is no obvious online home or community for the game. Four years after the rules were published, it’s hard to find more than one or two reports of games based on the rules and a couple of video reviews on YouTube. It’s a pity that there aren’t more reports from other players as these are good rules that deserve a wider audience among naval gamers.
What’s broken and needs fixing
Torpedoes
Torpedoes, like gunnery, are difficult to model elegantly in tabletop miniature rules. The torpedo rules in Find, Fix and Strike are greatly simplified, in line with the fast-play spirit of the rules. Rather than firing individual torpedoes, torpedoes are fired and resolved in salvoes: in effect all of the torpedoes from each torpedo mount are fired at once. That is sensible and saves time. Much faster than rolling dice for every torpedo. So far, so good.
The speed and course of the target ship are both irrelevant; so is the size of the target ship; and range only makes a difference at less than two inches (i.e. 2,000 yards). Torpedoes are treated like gunfire and resolved in the turn that the torpedo is fired, so you don’t need to track torpedoes from one turn to the next. You roll two dice (2D6) to hit with a salvo, hitting on 11+, and then roll for damage. The chance of a torpedo hit might seem low, but that’s partly an illusion caused by using much larger models than the sea scale -- i.e. in reality ships took up far less space than our miniatures do. How you calculate damage is not explained clearly and a worked example would help to clarify it.
Those simplifications speed up the game in the spirit of fast play. But they involve some big compromises that are worth understanding because they affect naval tactics, which is sort of the point of the game. The tactical situation basically doesn’t matter, so long as the firing ship is in range of the target and the target is within its torpedo arcs.
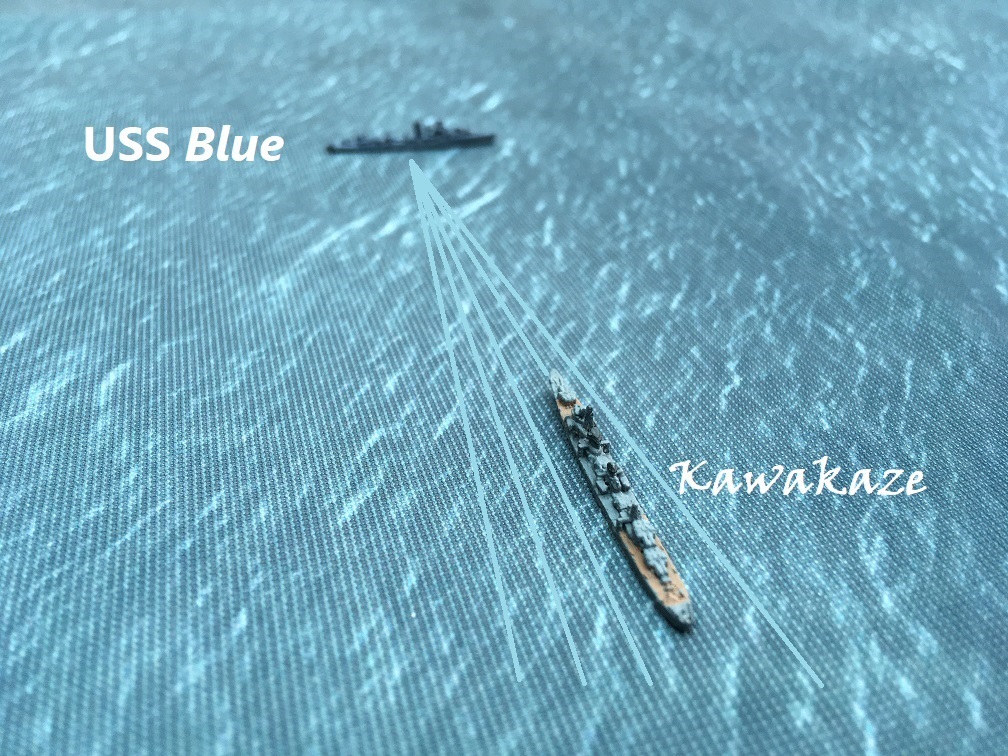
Kawakaze ought to be hard for Blue to hit with a torpedo because she is bows on to the Blue. But the facing of a target ship doesn’t matter in Find, Fix and Strike.
The first problem is that the torpedo rules take no account of the course or facing of the target ship. Having a ship’s bow or stern, rather than broadside, facing to torpedoes makes no difference in Find, Fix and Strike. A typical Second World War cruiser was nine, 10 or even 11 times longer than it was wide. All other things being equal, a destroyer or cruiser that is broadside on (perpendicular) to the track of the torpedoes is about 10 times more likely to be hit by a torpedo than a destroyer or cruiser that is parallel to the track of the torpedoes. If the direction of a ship matters enough to be included in the gunnery rules, it should absolutely be included in the torpedo rules -- though at least your ships won’t be punished for the 90° turning limit in the movement rules.
The second problem is that, because torpedoes are resolved immediately and the target ships have no opportunity or necessity to take avoiding action, the torpedo rules remove the tactical decision on how to respond to a (real or feint) torpedo attack. Si Vis Pacem has a neat rule for ships turning away to avoid torpedoes; it’s a pity that Find, Fix and Strike does not repeat it. Find, Fix and Strike neither encourages nor allows ships attacked with torpedoes to turn away. The tactics and outcome of the Battle of the Barents Sea in 1942 would have been completely different if the German ships had not had to keep turning away to avoid torpedoes. During Battle of the Malacca Straits in May 1945, the Japanese cruiser Haguro turned away from the British destroyer Venus because Haguro thought Venus had launched torpedoes, though the destroyer had actually failed to do so.
The third problem is that Japanese 24-inch Type 93 oxygen-powered torpedoes are treated only as long-range torpedoes. In itself, that works. There are no modifiers for their alternative use as very fast (50-knot) torpedoes that, not incidentally, left a far smaller wake -- though they do cause more damage when they hit, recognizing their larger warheads. So the rules don’t really replicate the surprise of Allied captains and crews in 1942 who literally didn’t see the oxygen-powered torpedoes coming or were hit when they thought they were outside torpedo range.
A worked example of how the torpedo rules work would really help players understand torpedo damage resolution.
Overall, I don’t think these torpedo rules work well, even for fast-play rules, because they remove the tactical challenge of getting destroyers into position to fire torpedoes effectively. All players have to do is get their destroyers within 8,000 yards of the enemy’s ships and hope to roll an 11 or 12 on two dice. It doesn’t matter if the enemy ships are heading away at high speed. It should. A fast ship that turned away from a torpedo not only had more time to take avoiding action; it might even outrun the torpedo until the torpedo’s fuel ran out.
The greatly simplified torpedo rules also create an imbalance between gunnery and torpedoes. There are 21 modifiers for gunnery, but only five for torpedoes, and one of those is for torpedo aircraft. If the direction of a ship matters enough to create a ‘Centreline of target intersects the shooting vessel’ gunnery modifier, there should certainly be one for torpedoes. In the spirit of fast play, I would trade a little less detail in the gunnery rules, or the special-damage rule, for a couple of additional modifiers in the torpedo mechanics.
I would also rewrite the torpedo modifiers that are based on damage to be based on speed. A ship that is moving slowly, or is stationary, should be easier to hit than one that is moving fast. It was not being damaged that made a ship easier to hit; it was being slow (which can be a result of being damaged). If you have a stationary target (e.g. an anchored ship), that should be a lot easier to hit than a ship moving at 30 knots.
Examples and diagrams
The tactical rules contain no diagrams to illustrate how the rules work, and only one worked example (of an attack by three flights of Avengers on a Japanese cruiser). That makes the rules harder to understand and pick up quickly. A few worked examples of the gunnery rules and of the torpedo rules would help players understand how the rules work and clarify some detailed points. Having to refer back from the torpedo rules to the gunnery rules to try to work out torpedo resolution, for example, just makes the rules harder to pick up and play.
The only pictures in the rules are a series of nicely chosen black-and-white photographs of warships and aircraft from the Second World War. No miniatures are pictured anywhere in the rules, which is a pity. Apart from the cover, the only colour in the otherwise black-and-white rules is on the diagram of gunnery arcs.
Game aids
There are no markers, counters, templates, data cards or other aids to help you play the game, apart from the two-page quick play rules summary sheet. You are likely to need splash, smoke, fire and flood markers, as well as searchlight, starshell and illumination markers if you plan night actions. It would be helpful if a few simple ones were included in the rules for new players to print out. Aircraft counters or markers would be invaluable too, for players who don’t already have the relevant aircraft miniatures. Hopefully these can be added to later editions.
The campaign game, similarly, needs some counters to track the positions of ships on the operational map.
Summary
Find, Fix and Strike is a comprehensive and playable set of rules written by an experienced wargamer. The rules are simple and effective and play quickly, absolutely delivering on the fast-play promise. The scope is vast and there are few aspects of Second World War naval warfare that are not encompassed somewhere within these comprehensive rules. The rules are also very reasonably priced at $9.15 on Wargames Vault here: https://www.wargamevault.com/product/26 ... and-Strike. That's great value for money (and less than half the $25 for Sam Mustafa’s Nimitz rules).
However, as a game, Find Fix and Strike seems somehow incomplete. If you bought a board game like this, you would be disappointed because all you have bought is the rule booklet. There are no examples or illustrations to help you understand how the rules work. There are no scenarios to help you get started with your first game. There are no markers, counters, or templates to help you play the game. So setting up your first game of Find, Fix and Strike takes some time and effort. Find, Fix and Strike can seem like a game written by an experienced naval wargamer for other experienced naval wargamers who don’t need any help, rather than for someone trying out naval gaming for the first time.
Fundamentally, this is an excellent and comprehensive set of Second World War naval wargaming rules that are excellent value for money. The rules just need more explanation (and fewer abbreviations). A second author or editor and a wider mix of play testers might have helped to make the rules a bit easier to use.

